So you’re wondering how to contact TikTok about a banned account? It happens to the best of us, and sometimes for reasons beyond our control or comprehension.
While sometimes bans are definitely warranted, other times you can get caught in a spam filter or someone reports you when you shouldn’t have been reported.
So, if you find yourself receiving a ban hammer from TikTok with no rhyme or reason, you’ll need to figure out how to contact TikTok to find out what you did wrong and if you can get your account back.
Reasons You May Have Been Banned from TikTok
TikTok, among all social media platforms, is actually pretty laid back. Of course, like any business, they must protect themselves and ostensibly their users, so they will have rules, policies, and guidelines.
The most common reasons to get a TikTok ban are pretty understandable.
Threat to Public Safety
Much controversy surrounds the concept of threat to public safety. Yes, we live in a free country. Yes, we have a right to free speech.
But one hundred years ago, the Supreme Court of the United States decided that we actually don’t have the right to free speech if that speech is a threat to public safety.
In the decision, one of the justices used the example of shouting “fire!” in a crowded movie theater.
Unless there’s an actual fire, you cannot shout out a word that will create panic and potentially cause great harm to people.
TikTok is merely following that ruling with this policy. You cannot post content that will encourage violence or intentionally cause harm to others.
Fair enough, right?
Sexually Explicit Content
TikTok is not the place to go for porn.
That’s it.
TikTok tries to keep their content light and family friendly. It is really a platform for young people as most users are under the age of 25 and all the way down to 12, so yea, there should not be a bunch of naked pics or videos on your TikTok feed.
If you’re hoping to gain attention and followers for sexually explicit content, more power to you, it’s just not going to happen on TikTok.
Self-Harm
Look, we all have dark days, and depression has been on the rise over the last several years, and social media is a great place to come to feel connected or engage with others who may be in the same boat.
But – you cannot promote self-harm on your social media platforms and expect not to have the content removed.
Images of self-harm are highly triggering for those dealing with mental health issues, and especially if they have a sensitive or compulsive brain, they may be prompted to act out those images on themselves.
This one really goes back to the threat to public safety.
When you post content encouraging or glorifying self-harm, you are posing a threat to your viewers.
So yes, you will be banned.
Violent or Graphic Content
Like with the sexual exploitation stuff, there are plenty of places to go on the internet to share or watch videos filled with violence and graphic content.
TikTok is not one of those places.
So if you have shared content that is bloody, gory, depicts death and destruction, your account will be banned.
Illegal Activities
I mean, this one feels kind of obvious, right?
If you rob someone’s house or steal a car, maybe don’t take a video and post it on TikTok.
For so many reasons beyond a TikTok ban.
I know we are now in the generation of “pics or it didn’t happen,” but maybe in this case that’s a good thing?
I don’t actually have to include a disclaimer here that says “also if you are engaging in illegal activities, consider a lifestyle change,” do I?
Oh well, consider it disclaimed.
If you post illegal activities on TikTok, you will be banned.
Consider yourself warned.
Blackmail and Threat
These two go hand in hand with the illegal activities ban. Blackmail and threats are both illegal.
But it gets even more specific here.
It’s also just not a great idea to keep a video or image recording of you online blackmailing or threatening someone.
Remember, the internet never forgets.
And yes, we all make mistakes and do some really stupid stuff when we’re young.
I cannot tell you how many times I have sat in gratitude that I grew up in an age long before posting every inane activity online was not only normal but expected.
So, of course, first, don’t blackmail or threaten people online or IRL.
Second, if you do make a mistake like this, don’t post it on TikTok!
Or… you will be banned.
Spam, Impersonation, Misinformation
Okay this last one is tricky.
Sure, spam is just annoying, and you deserve a ban if you’re spamming people.
No one likes a spammer.
Also, impersonation?
Who does that?
It’s as annoying as spamming.
I see so many of my favorite accounts complain that someone is impersonating their accounts.
Why?
I just can’t see the value in growing a followership as a fake account. Plus, you will be found out. You always are!
But in terms of misinformation, things get murky here, and I see a lot of people lose accounts on this issue when they really should not.
If this is you, know that I sympathize with you greatly.
We are living in an era of intense censorship, and it really has come down to what each company deems true and false, which is obviously unfair because information changes so rapidly on several topics!
What was a downright falsehood two years ago is now an absolute verifiable fact.
Or a fact that we see one way can shift with new evidence and show us new light.
The awful reality we have to live in during this Information Age is that some people, and companies, want to control the flow of information, and platforms wield a lot of power when it comes to this flow.
If you have been a victim of a ban based on information you shared that you know to be true, you should definitely appeal the decision and get your account back.
Copyright Infringement
You cannot steal and use other people’s videos and that includes the use of images you do not own in your videos along with any music. This is copyright infringement and you can be reported and be banned from TikTok.
How to Contact TikTok About a Banned Account
Whether you feel you’ve been misunderstood, misrepresented, or maligned, and you want your account back, fear not, there are ways to contact TikTok to clear things up.
Temporary Ban
First, you might just have a temporary ban, in which you don’t need to contact anyone for anything.
This happened to me on Facebook, and most platforms, including TikTok have this automatic ban for users caught by an algorithm and temporarily banned as a result.
The social media platform will typically tell you what you did wrong (it will show as a notification) and say you are temporarily banned from posting and/or commenting for a certain amount of time.
Once that time limit is up, your account will go back to normal.
If this temporary ban is your problem, you’re better off just waiting it out.
Shadow Ban or Permanent Ban
However, if you have a shadow ban, which means you are still engaging but none of your content is posting for viewers, or a permanent ban where you are simply locked out of your account, you will need to contact TikTok.
Now, if you knowingly posted content, you were not supposed to repeatedly, TikTok has likely warned you on multiple occasions not to do so, and you ignored them.
You got banned.
You knew it would happen.
The chances they get your account back online as a result of your appeal are very slim.
But if you do proclaim your innocence and this is all a big mix up, you can open your TikTok app and tap on the profile icon.
Then, click the three stacked lines icon in the top right corner.
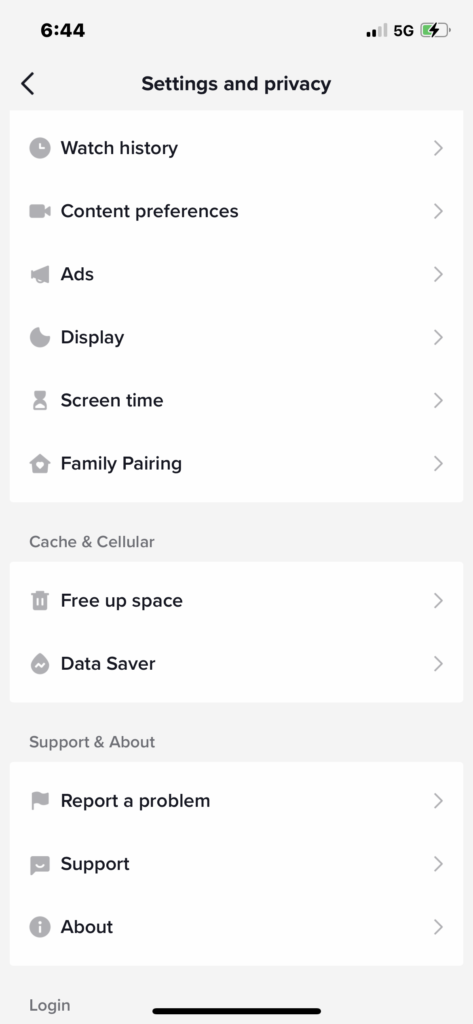
On Settings & Privacy, scroll down and tap Report a Problem.
Click on Account and Profile and select Profile Page, then select Other.
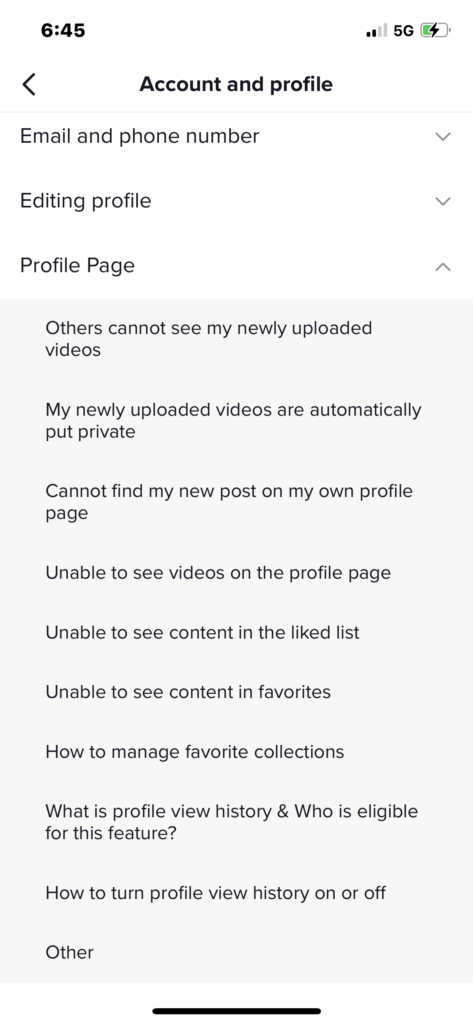
Click Need More Help.
Finally, create a report and tap Appeal or Report.
Give it about 5 days and you should hear back from TikTok on their decision.
If you don’t hear anything or you don’t get your account back and you still want to appeal, you can send a direct email to business-servicesupport@tiktok.com to escalate the situation further.
Good luck!