• Parenting
  • Food
  • Do it Yourself

How to Knowledge

  • Travel
  • Finance
  • Technology
  • Home
  • DIY
  • Finance
  • Food
  • Parenting
  • Technology
  • Travel

How to Download YouTube Videos MP4

June 4, 2022 Leave a comment

YouTube is the second-most visited website on the internet – after Google – with over 14.3 billion visits every month. That’s more than Wikipedia, Instagram, Amazon, Facebook, and Twitter!

As a YouTube user, you can watch videos on the website or through various YouTube apps. Sometimes, however, you may want to download the video for offline viewing or save it just in case it’s ever taken down.

Whatever reason that may compel you to download a YouTube video, we’ll explain the best ways to do this. It’s possible – and very easy – to download YouTube videos on your PC, Android, or iOS devices.

What is YouTube?

YouTube is a video-sharing site that allows individuals to watch and share online videos. Founded in 2005, YouTube is now among the most popular websites, with billions of monthly visitors.

One of the many reasons YouTube is so famous is the significant number of videos you can find there. In fact, it’s estimated that 100 hours of videos are uploaded on the platform every minute, meaning there is always something new to watch.

Plus, you’ll find all kinds of videos on this video-sharing platform, some of which you may want to save for later. So, whether it’s the videos of adorable cats, funny science lessons, or cooking tips, here are a few ways to download YouTube videos:

How do I download YouTube Videos Mp4?

You can download YouTube videos in MP4 format in a straightforward way. All you need is the right guide and an internet connection.

Here are several easy ways to download YouTube Videos to your iPhone, Android, or Computer:

Method #1: Pay for YouTube Premium

This is perhaps the only ‘legal’ method of downloading YouTube mp4 video files approved by Google. However, this method has one drawback: you can only use this method on mobile phones or tablets.

So, how do you use the YouTube Premium subscription method to download YouTube Videos?

It’s simple – all you have to pay is $11.99 to access YouTube Premium. Then, you can download your video file as follows:

  1. Open the YouTube app and search for the video you want to download
  2. Under the player, you should see the Download icon; click it
  3. Pick the video quality you want to download
  4. Your video should download in minutes

Once the download is complete, the icon below the video should change to a blue tick – click it if you want to remove the mp4 file. You should be able to view all your downloaded YouTube videos in the Account tabs or Library.

Method #2: Download YouTube Video using VLC Media Player

If you have the VLC media player, you can use it to download videos from YouTube – download it here if you don’t have one. However, this method may fail when downloading videos with restricted age or location.

Here is how you download YouTube video files using VLC:

  1. Open the video you want to play on YouTube and copy the video URL
  2. Open your VLC video player
  3. For Windows users, click the Media button at the top left corner of the VLC player. Then, select the Open Network Stream option
  4. For Mac users, select file> Open Network
  5. Paste the YouTube video link in the resulting text box and click the Play button. Your video should load on the media player
  6. Then click on the Tools button in the top right-hand corner of the page and select the codec information option. Alternatively, you can click the CTRL+J command
  7. The following window will pop up
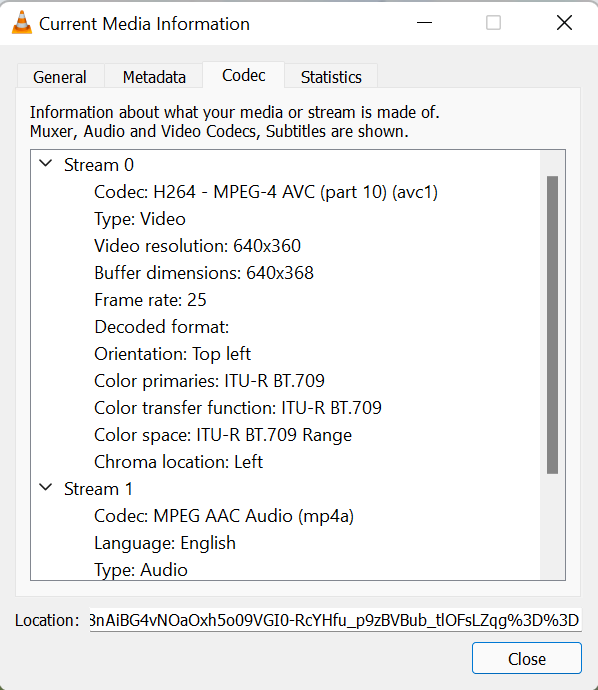
  1. Copy the video information from the location text box and paste it into a browser. For Mac users, right-click on the field and tap on the Open URL option
  2. The video should load and start playing on the browser. To download it, click on the three-dot icon on the bottom-right part of the page and click download

Method #3: Using Open Video Downloader

Open Video Downloader is one of the best free YouTube video downloading tools for Windows PC and Mac computer users. It allows you to get video content from your favorite multimedia sites, including Vimeo, YouTube, Facebook, Twitter, etc.

Here is how you use this YouTube download tool:

  1. Open the YouTube video on any web browser, such as Chrome, Opera, Safari, etc.
  2. Copy the video’s URL by highlighting it in the address bar. You can also right-click on the video and select Copy Video URL
  3. Launch the Open Video Downloader app. The app should be in your Mac’s Applications folder or Windows Start menu
  4. Paste the URL of YouTube video in the address bar and click the + button
  5. Select your download preferences, including the video resolution
  6. Tap on the green Download button located at the bottom of the page. The video should start downloading.

The video should take several minutes to download, depending on your internet speed and the video size and length. Keep checking the progress bar to know when your video is downloaded.

Method #4: Download YouTube video with ByClick Downloader on Windows

If you have a PC running on the Windows operating system, you can use several desktop apps to download YouTube videos – some are free while others aren’t.

One of the most reliable desktop apps you can use to download YouTube videos is the ByClick Downloader. Although it’s not free, this downloader has an easy-to-use interface, is regularly updated, and makes it extremely easy to download mp4 and mp3 files from YouTube.

Launch the app and paste the URL into the text box. A pop-up with quality options will appear, which will also ask you whether you want to download video or audio files.

The ByClick YouTube Downloader costs $9.99, but you have a 24-hour free trial without having to enter payment details.

Method #4: Download YouTube videos using browser ad-ons

Some people hate messing around with YouTube video URLs or installing third-party tools on their PC or mobile devices. In this case, you may use browser extensions to help download YouTube videos.

Here is how you do it:

  1. Choose an add-on

Several add-on options are available to download YouTube videos, including Addoncrop YouTube Video Downloader, Internet Download Manager, Easy YouTube Video Downloader, etc. Most of these tools are suited for various browsers, including Chrome, Safari, Opera, Firefox, etc.

Choose the add-on, install it, and add it to your browser. Then, you can proceed to download your YouTube video as follows:

  1. Search YouTube

Go to YouTube and search for the video you wish to download. You’ll notice an icon on the top right-hand side or any other place on the page, prompting you to download the video; click the download option.

  1. Choosing file formats

Most YouTube videos will allow you to save the video using the format or quality of choice. Usually, a pop-up appears during the download choice, asking for your preferences.

Method #5: Downloading YouTube videos directly

While the video downloading tools mostly work, you don’t always have to use them. You can choose to download the YouTube videos directly, as directed below:

  1. Open the YouTube site and search for the video you want to download
  2. Then, add ‘ss’ to your URL – after the ‘www.’ but before ‘youtube.com’ and hit the Enter button.
  3. You’ll be redirected to a free download site where you can download the video

You’ll be prompted to choose the quality of video you want. You can also switch to audio format in this section.

Method #6: Downloading YouTube videos on iPhones and iPad

Downloading YouTube videos on iPad and iPhone can be challenging because Apple controls the apps you can get on their store. We figured that out, so we made this section for iPhone or iPad users who want to download YouTube videos.

There are fewer app restrictions if you jailbreak your iPhone, but there are different ways to download YouTube videos if you don’t want to use that route. Here is one of the best ways to download YouTube videos on iPhone or iPad:

  1. Download and launch the Documents by Readdle app
  2. Open the web browser and go to https://www.videosolo.com/online-video-downloader/
  3. Paste your YouTube URL in the text box and hit the Download button
  4. After selecting your video preferences, enter a name and choose the location for the video
  5. Open the Documents app and tap the Downloads section in the bottom navigation bar
  6. Open the Download folder on the Documents app home screen. Tap the three-dots icon to save the downloaded video to your iPad or iPhone hard drive.

Method #7: Using an online converter on PC or Android device

You can use mp4 converters to download YouTube videos to your PC or Android phone. Here is how you go about it;

  1. Copy the video URL from YouTube
  2. Go to your mp4 or mp3 converter of choice and paste the URL
  3. Hit the Download button to scan and download your video. You can convert videos to mp3 or different formats using these free tools.

Note: Most online converters are supported by ads, some of which can be invasive. To avoid these ads, you may consider using free ad blockers.

Is downloading YouTube videos legal?

While downloading most YouTube videos is legal, doing so may violate Google’s terms of service. Generally, it’s illegal to download videos with permission, sell them, or violate copyright laws.

However, YouTube doesn’t penalize users for downloading royalty-free or other videos from their platform. Plus, if you download a video for personal use, that can be considered legal.

The bottom line

YouTube is among the most popular video-sharing apps, with millions of videos. And whether you like documentaries, funny videos, or educational content, there is always something for you on YouTube.

This post provides you with seven easy methods to help you download your favorite YouTube videos. Good luck as you purpose to use it to download your favorite videos to your phone or PC.

Filed Under: Technology

How to Get Free Fortnite Accounts

June 1, 2022 Leave a comment

If you have a gamer in your household, the chances are that you’ve heard of Fortnite – the online multiplayer game that has taken over the world. Fortnite was introduced into the gaming world in 2017 and is now one of the most prosperous online video games ever.

Today, the game averages more than 24 million daily players worldwide and has a wide array of exciting features ranging from unique skins to the ability to change your avatar. However, you need a Fortnite account to enjoy the different features.

girl holding phone with fortnite app open

This post will discuss the Fortnite game and provide you with tips on how to get free Fortnite accounts. These accounts are authentic and will 100% work on your PC, PlayStation, Xbox, and mobile.

Let’s dig in!

Fortnite game

Fortnite is one of the most popular games in the 21st century. Developed by Epic Games Inc., this exciting and fun game was introduced in 2017 and has grown at an incredible rate.

And if you have not heard of the famous Fortnite game before, it’s to know it and see if its action-packed gameplay excites you. Fortnite allows gamers to battle online on popular game styles like Battle Royale and Survival.

Battle Royale game was introduced in 2017 as an early access title, with Creative following in December 2018. The game is free of cost, meaning you can play it without spending anything.

You can play the game on various platforms, including PC, PlayStation, Xbox, mobile phones, etc. However, you can only play certain games on specific platforms.

For instance, Fortnite Save the World is only available for macOS, Microsoft, Windows, Xbox One, and PlayStation 4. On the other hand, Creative and Battle Royale genres are available for all the above platforms as well as iOS, PlayStation 5, Xbox Series X, Android devices, and Nintendo Switch.

boy playing fornite on laptop

Fortnite game modes

Today, the Battle Royale mode is Fortnite’s core game mode, but it didn’t start that way. This game mode was introduced shortly after the PUBG release.

Today, the Fortnite game has three modes, including:

  • Fortnite: Save the World
  • Fortnite Battle Royale
  • Fortnite Creative

Why do I need a Fortnite account?

When you launch the Fortnite game for the first time, you’re given an option to create an Epic Games Account or start playing immediately. If you opt to start playing immediately without creating a new Fortnite account, a ‘nameless’ Epic Games account is made so you can play.

However, the accounts are in a limited edition, with some information and features missing. You may also create a new account by submitting your personal information.

The bottom line, getting an Epic Games account has innumerable benefits and rewards, including high-quality Skins. The good news is that there are free Fortnite accounts for use by players.

Here are some of the free Fortnite accounts rewards:

  • Free V-Bucks to use (as much as you want)
  • Premium Fortnite free beautiful skins – like Black Knight, Dark Phoenix, Spider-man (No Way Home), Eddie brock, etc.
  • Free Fortnite game Dances and Emotes of 2022
  • High levels Accounts with free Fortnite account email and passwords

How do I get free Fortnite accounts?

You have hit the jackpot if you are looking for free Fortnite accounts. We’ll provide you with updated login information (usernames and passwords) to secure Fortnite accounts.

colorful image that says fortnite

Fortnite free accounts for PlayStation 4

PlayStation is one of the most popular gaming systems for Fortnite. It’s more fun to play your game on PlayStation than on mobile devices or PC.

If you’re among the Fortnite lovers that play the game on PS4 and want free Fortnite accounts, we have a list of emails and passwords that may help.

Email

Password

bahogbelat@gmail.com

iyot14398

updateios27@gmail.com

rosie124

ZartBoyIsBack@gmail.com

0988723441955230

cmonster@gmail.com

554533

Axundova010@gmail.com

silaali321

caraqu@gmail.com

a123789654

pokemon4ever72@gmail.com

pokemon4ever72

Yasar_tuzun3@gmail.com

53822114ya

Fortnite free account for iOS and Android

Nowadays, gamers play the Fortnite game on mid-range and higher-end mobile phones. And if you’re among the individuals that use their smartphones to play this game, you may want to know how to access free Fortnite accounts.

First you need to download the game application on the app store and login using the free Fortnite account username and password.

Here are several free Fortnite accounts for Android and iOS devices:

Email

Password

Eftowent_senit@hotmail.com

Chersycolom

Whater_fluyen@hotmail.com

Hanstoytneg3054

lagytamot.sawivan948@outlook.com

lalponyo5938

Ebantroku_topibals@hotmail.com

enabiltouven54

Fortnite free account for Xbox

If you play Fortnite on various consoles like Xbox, here are a few free Fortnite usernames and passwords to use:

Email

Password

Eftowent_senit@hotmail.com

Chersycolom

Whater_fluyen@hotmail.com

Hanstoytneg3054

lagytamot.sawivan948@outlook.com

lalponyo5938

Ebantroku_topibals@hotmail.com

enabiltouven54

Other sources of free Fortnite accounts

The account details provided above may not work with time, especially when users change their passwords. If that’s the case, you can use several other free Fortnite accounts generators, including BugMeNot, Game Screw, etc.

How does the Fortnite free accounts generator work?

The answer to this may vary from one account generator to another. However, most of them will require you to launch their website and complete a few simple tasks to access the free accounts and passwords.

playstation controller with image that says fortnite

For instance, you may be required to complete surveys or other tasks to get free access to Fortnite accounts. Others will need you to verify that you’re a human, while others won’t.

At times, the free Fortnite username and passwords will be different for different platforms. For instance, the login details for PS4 may be different from that of an Xbox or PC.

Now let’s go into detail on how each of the most popular Fortnite free account generators works:

BugMeNot

If you don’t like completing challenges and tasks to get free Fortnite accounts, BugMeNot comes in handy. It features thousands of free accounts with usernames and passwords to play varying games, including Fortnite.

The best thing about BugMeNot is that you don’t have to worry about the security of your details as you don’t have to fill anything to use the site. Plus, you get secure and unique login details for Fortnite.

Hackivo

Hackivo is another amazing website that gamers use to give and receive free accounts and cheat codes for various games, including Fortnite. This website also provides extra information that you may need in games, including the best gaming machines to use.

One of the perks of this free website is that it’s easy to use to give or get free accounts. To set up your account, visit Hackivo and complete the simple surveys, after which you can receive or share free Fortnite accounts

Boom Alts

Boom Alts is yet another very reliable account to access free Fortnite accounts. To get started, Boom Alts requires you to complete a few simple tasks and/or take several surveys.

Once you set up your account, you’re guaranteed to get secure and unique Fortnite login details. Then you may enjoy exclusive Fortnite accounts using these details.

Game Screw

This website provides the gamers with the utopia-kind of life they want – it’s simply every gamer’s heaven. It has all the cheat codes and free game account details you may want to play online games.

Cheat codes are mainly used to complete game levels, while the account login emails and passwords give you access to free accounts, including Fortnite. This website also provides free V-Bucks and skins to make your avatar look great.

However, the skins are selected randomly, so you can choose which skin you want.

Fort Account

Fort Account is specifically designed to offer Fortnite players free access to usernames and passwords for thousands of Fortnite accounts. Launch it and click on the Get Accounts button to get started with this website.

The website also features free skins and V-bucks to improve your Fortnite avatar.

Reddit

Yes, Reddit is a social media site, but it is also used as a gaming accounts market. It has many specific subreddits whose primary role is to trade or give free gaming accounts, including the latest Fortnite accounts.

For instance, there are the r/FortniteFleaMarket, r/GamingMarket, etc., whose prominent role is to trade Fortnite (and other games) accounts. You may use them and search ‘Free Fortnite account generator’ to get cheap or free Fortnite accounts.

Reddit is also among the best for getting free, and up-to-date Fortnite V Bucks Generator accounts with skins.

PlayerAuctions

PlayerAuctions is another popular website that has gaming accounts. You can get a cheap or free Fortnite account through this website if you’re lucky enough.

However, remember that Fortnite doesn’t allow the re-sale, re-use, or marketing of Fortnite accounts. As such, the validity of the free Fortnite accounts is at risk.

Fortnite Memes

To close our list of some of the best free Fortnite account generators is the Fortnite memes. This site is a haven for Fortnite gamers; it features every piece of information they may need for smooth gameplay.

For instance, it provides Fortnite gamers access to free Fortnite accounts, free Fortnite skins, and free V Bucks. And the best thing about the site is that it doesn’t require human verification or surveys.

Join Fortnite meme’s Facebook group to receive Free Fortnite Bucks and Skins generator accounts if you have a Facebook account.

Final thoughts

There you have it, friends: the complete information about getting free Fortnite accounts. These accounts are 100% real and secure. We’ve also listed some of the trustworthy free Fortnite account generators.

Good luck as you purpose to use it to get new accounts to improve your Fortnite gaming experience!

Filed Under: Technology

How To Deal With Mice

May 31, 2022 Leave a comment

The Mickey Mouse and Jerry in cartoons may look adorable, but real mice can be troublesome pests. In addition to destroying your home and appliances, mice carry serious illnesses, including hantavirus and salmonella.

So, however gracious of a host you are, you’d never want to share your home with the mice. The good news is that the mice infestation can be prevented through exclusion and sanitation and controlled when it occurs.

This post will discuss everything you need to know about mice infestation, including what mice look like, what attracts them to your home, and how to deal with them.

Feel free to jump ahead!

What’s a mouse, and what does it look like?

The house mouse is among the most common mammals in the world. And although they’re native to Central Asia, the mouse came to the U.S using the first European ships to arrive on the mainland.

Adult mice have small, slender bodies, weigh between 0.5-1 ounce, and have a lifespan of about 6-18 months. They have large and almost hairless ears, long tails, sparsely furred, and covered in scales.

Mice are agile and highly adaptable. They can jump to a height of 12 inches or higher and have good senses of touch and smell.

What do mice eat?

Mice are mainly omnivorous, although they prefer grains, nuts, seeds, and cereal. However, the mice will consume whatever is available to them, including farm produce, crops in the garden, and pet food.

They have sharp, long-lasting teeth to chew through rubber materials and plastic packaging, meaning the rodents can access even sealed containers. They’re notorious for chewing cables, wooden cabinets, and other valuable materials in the home.

What attracts mice to my home?

Essentially, mice have the exact needs of human beings: food, shelter, and comfort. And if these are readily available to them, they’ll take every opportunity to make themselves comfortable in your house or business.

Let’s go through the things that may attract mice to your home:

Food

Mice will barely resist the lure of food, whether leftovers, freshly-cooked meals, or food debris. And although they are omnivores, they prefer a diet with fruits, seeds, grains – anything with high levels of carbs.

Shelter

As the hot sun of the summer disappear and the winter sets in, mice will look for shelters inside our homes. They’ll squeeze themselves through small spaces (as small as ¼ inch) to get inside your house.

Nesting materials

Mice make nests to give birth and bring up their offspring. They like soft materials like pet hair, cotton, shredded papers, and insulation, most of which can be found inside homes or business premises.

How do I know if I have a mice infestation?

Mice leave behind clues that are easy to notice. Some signs of rodent infestation include;

  • Chew-or scratch marks; are easily noticeable on shelves, baseboards, or around food packaging.
  • Food crumbs or debris; found on shelves or other unusual places like the middle of a room.
  • Mouse droppings; resemble small oblong pellets. You can find them in used corridors, room corners, or under sinks.
  • Nests; created from shredded paper, pet hair

Noises,  such as scratching or squeaking in the walls at night.

  • Odd pet behavior such as barking, scratching or pawing at or under appliances. \

How do I get rid of mice naturally and in a humane way?

If you’ve got a mouse problem in your house, you’re probably wondering how to get rid of them. There are lots of humane ways to do it.

Mice are attracted to food, so if you have an infestation, it’s probably because something in your home attracts them: crumbs on the floor, pet food left out overnight (they love cat food), or even dirty dishes in the sink.

Here are 5 ways to deter mice from entering your home and prevent them from breeding.

Seal potential entry points.

First, seal all entry points where mice can come into your house. This includes sealing holes in the walls and cracks or crevices around windows and doors. 

Steel wool blocks small holes, while spray foam works well for larger holes or gaps. You may have to seal off several areas. The last thing you want is a bunch of mice running around while you’re trying to sleep at night!

Get rid of any food waste.

Get rid of any food sources that attract mice, such as pet food left out overnight, birdseed, or grain that has fallen off the shelf in your pantry or basement. 

Keep all foodstuffs tightly sealed up in airtight containers, such as plastic bins with lids on them, so that there is no way for mice to get into them. 

You should also clean up after yourself when you cook at home so that no crumbs or spills remain on the countertops or stovetop areas.

Set mouse bait traps. 

Mice are crafty creatures, so catching them requires time and effort. Traps are effective because they give you a chance to kill the mouse without having to see it or touch it first. 

There are many different traps available for purchase at pet stores and hardware stores. However, there are also homemade versions that you can make yourself using things you have lying around your house.

The types of mouse bait traps available on the market today include:

Glue traps

Glue boards come in various shapes and sizes; they’re usually thin pieces of cardboard covered with glue on one side, which allows them to stick firmly to whatever surface they’re placed on—such as walls or floors.

When a mouse steps onto or touches the glue board, it becomes stuck and can’t move off until someone comes along and frees it (or until it dies). 

Glue boards are typically used for catching larger numbers of mice at once (such as those living in an attic) rather than individual ones.

Electronic Mouse Traps

Electronic mouse traps use electric shocks to kill mice within seconds after they step on the trap’s metal plates. This may be an excellent option if you need something quick and painless for your rodent issue.

Live traps

A live trap is usually made from wire mesh with a door at the end where the mouse enters. Bait such as hazelnut spread or dog food is placed inside, which lures the mouse in to try to take it. 

Once inside, it will not get out again, but it can be released without causing harm to either the animal or human. Live trapping is an excellent choice if you’re trying to catch rats humanely.

Snap traps

Snap traps are one option for getting rid of mice, but it entails killing the rodents. When a rat steps on these traps, they snap around its neck, killing it instantly. 

These traps are effective, but they are not always humane, and their design can make them difficult to use for some people.  

A snap trap necessitates simultaneously pressing two buttons while avoiding getting your fingers caught between them as they snap shut. If you have minors or pets in your home, this may not be an option for you.

You can set these bait stations near entry points around your house: under sinks or stoves; in dark corners; behind appliances like refrigerators, freezers, or washing machines; under desks and cabinets; behind water heaters; in cupboards; around plumbing pipes (especially outside). 

Use repellents such as peppermint oil. 

You can find natural repellents at your local pet store or online. These products usually contain peppermint oil or other essential oils, which rodents don’t like. 

Put some drops of peppermint oil on cotton balls or homemade mousetrap and place them around areas where you know mice are living. The smell will keep them away from these areas.

Bait Them With Peanut Butter

Mice are attracted to peanut butter because it is high in protein and fat. You can make your own peanut butter bait by mixing peanut butter with flour. 

This will give the mouse something to hold onto while it eats the peanut butter, making it easier for you to catch it once it has consumed the bait. 

Place this mixture in areas with mice signs or where mice have been entering your home. Once an animal eats this mixture, it will become very lethargic, which allows you to catch them with traps or by hand easily.

What if all fails?

In some situations, you may want to hire pest control professionals to deal with a larger mouse infestation than a homeowner can handle. 

Pest control companies often use traps and poison baits to eliminate rodents from an area. They also use chemicals that are applied directly to the source of the problem — inside walls or beneath floors — to kill pests on contact.

The bottom line:

There you have it; The best ways to deal with mice and how to keep them from coming back. If you’re ready for the challenge, try out some of these mice removal methods and see how they work for you!

Good luck!

Filed Under: DIY

How to Clean Silver Jewelry

May 31, 2022 Leave a comment

Let’s face it: buying and wearing jewelry is all fun, but cleaning this precious metal isn’t a task anyone wants to add to their to-do list. This is especially the case when dealing with silver jewelry that easily tarnishes.

A chemical reaction happens when silver is exposed to air, giving the jewelry a black tarnish. Luckily, your silver items aren’t destroyed – you need to learn how to clean the jewelry to make your silver pieces shine again.

This post will take you through the best silver jewelry cleaning methods. We’ll also go through a few top tips to help you avoid the black tarnish.

Let’s dive right in!

How do I clean a piece of silver jewelry?

Silver jewelry is a soft, lustrous metal, so gentle cleaning is mostly enough. The fastest and easiest method to clean the piece is by using warm water and mild dishwashing soap or baby shampoo.

Here is a step-by-step guide to cleaning your silver jewelry using this method:

  1. Add several drops of liquid dishwashing soap to warm water. Stir the solution until bubbles form
  2. Leave your silver jewelry soaked in the soapy water for about 5-10 minutes
  3. Using a soft toothbrush, clean the crevices of your silver piece
  4. Rinse your jewelry in warm, clean water
  5. Dry the jewelry using a microfiber cloth. Avoid paper towels as they may scratch your silver jewelry.

While this method should effectively clean most of your silver jewelry, some pieces may require other cleaning methods. For instance, your silver chains, bracelets, and rings need more detailed cleaning methods to give out their best sparkle.

Let’s see how to clean the sterling silver jewelry:

How to clean sterling silver

Sterling silver is an alloy obtained by adding copper to pure silver to make it more durable and less soft. Usually, this type of silver has a purity of 92.5%, with the remaining 7.5% composed of the alloy (copper, zinc, or nickel).

Copper is the main culprit for the tarnish on sterling silver jewelry. It reacts with ozone and hydrogen sulfide in the air, causing the black tarnish.

Hair sprays, perfumes, and sweat can also react with the piece, leading to tarnish. Try dishwashing soap and warm water first to clean your jewelry, and resort to the following methods if it doesn’t work:

Method #1: Baking soda

This is one of the most effective ways to remove the heavy tarnish in your silver jewelry. It leads to a chemical reaction that cleans your silver piece of jewelry within seconds or minutes.

Here is a step-by-step guide to cleaning your sterling silver jewelry with baking soda:

  1. Bring some water to boil – it should be enough water to cover the bowl
  2. Cover a soup bowl or vessel with an aluminum foil, with the shiny side facing up
  3. Add one tablespoon of baking soda with water. The ratio for this combination should be one part of the water to two parts of baking soda to obtain a thick paste.
  4. Place your piece of jewelry in the soda solution, making sure it touches the aluminum foil. Alternatively, you can rub the mixture onto the silver jewelry
  5. Leave the jewelry to rest in the solution for about 2-5 minutes. Extend this time to up to 10, depending on the tarnish severity.
  6. Using a pair of kitchen tongs or a spoon, remove your silver jewelry
  7. Rinse it under cool water and dry it with a clean cloth or a microfiber towel

You can also add one tablespoonful of salt to the baking soda solution for the best results.

Method #2: Vinegar and baking soda

If baking soda alone doesn’t work, you can try adding white vinegar to the mix. The resulting solution has acidic properties, ideal for cleaning black tarnish off your silver jewelry.

Here are step-by-step instructions to clean your silver jewelry using baking soda and white vinegar:

  1. Mix two tablespoons of baking soda and a cup of white vinegar in a bowl
  2. Leave your chain soaked in the mixture for about 2-3 hours
  3. Remove the jewelry and rinse it with warm water
  4. Dry and polish your jewelry with a soft cloth

Method #3: Lemon and olive oil

Lemon and olive oil are also very effective in cleaning sterling silver jewelry. Lemons have citric acid, a powerful natural cleansing agent, making it effective in washing the tarnish off silver off your silver jewelry.

Here is how you clean your sterling silver jewelry with lemon and olive oil:

  1. Mix half a cup of lemon juice and a tablespoon of olive oil
  2. Dip a clean cloth in the resulting solution and rub your silver jewelry
  3. Rinse with lukewarm water
  4. Dry with a soft cloth

Method #4: Toothpaste

Small amounts of diluted toothpaste and soft-bristle burhs can do wonders in cleaning sterling silver jewelry. However, don’t use this method for silver-plated jewelry.

Method #5: Silver polishing cloth

Silver polishing cloths are soft cloths specifically designed to clean silver jewelry. They are infused with chemical cleaners, so you can use them without adding polishing creams or other additional products.

Here is how you use a silver polishing cloth to clean your silver jewelry:

  1. Clean your silver jewelry using the silver polishing cloth, abiding by the manufacturer’s instructions. Most will require you to scrub back and forth, not in a circular motion.
  2. The black tarnish will come off onto the cloth as you scrub. Work in small sections for the best results.

Method #6: Ketchup

Yup, you read that right. Ketchup is one of the most effective methods for removing tarnish from your silver items.

To use this method, add several drops of the ketchup on a paper towel and apply them to the surface of the jewelry. If the tarnish is stubborn, leave the ketchup sitting on the area for about 10-15 minutes before rubbing with a polishing cloth.

Then, rinse your jewelry with lukewarm water or a damp cloth, and dry and polish it with a clean cloth.

How to clean silver rings, earrings, bracelets

Fiddly jewelry pieces demand more care, especially if they have pearls or stones. The good news is that there are easy methods to clean these pieces, including silver polishing cloth, cream cleaner, etc.

Alternatively, you can use the simple method below:

  1. Mix three parts of bicarbonate of soda (paste) with one part of water and apply it to your silver jewelry. Take care to avoid pearls or stones
  2. Using a microfiber or lint-free cloth, rub the paste into the silver until the shine begins to return. Use a soft toothbrush to get to the intricate areas hard to reach.
  3. Rinse off the paste with a lint-free cloth to remove the remaining tarnish

How to clean silver chains

Your silver chains can tarnish quickly from contact with perfumes, lotions, perspiration, etc. Luckily, you can clean your silver pieces with several simple methods.

For instance, you can decide to use the QuickShine Jewelry Bath or use the following eco-friendly home remedy:

  1. Cover a small bowl with aluminum foil, with the shiny side facing up
  2. Add hot water to the bowl and silver soak your chain
  3. Add about a tablespoon of bicarbonate of soda per half-liter of water
  4. Leave the chain submerged in the solution for about 30 minutes
  5. Remove the chain from the bath, rinse with cold water, and dry it with a lint-free cloth

What’s the best silver cleaner?

If you don’t want to use DIY solutions, many solutions, creams, and commercial cleaners can do the job. You can also use the polishing cloth to remove the black tarnish from your silver jewelry.

How do I prevent tarnish on silver jewelry?

The one surefire way to tarnish-free jewelry is prevention. Although preventing your silver jewelry from heat, air, and moisture is almost impossible, you can do a few things to limit exposure.

Here are the best tips to prevent tips on silver jewelry:

Apply lotion before your jewelry

The fragrance-free, water-based lotion with fewer chemicals can act as a protective agent against tarnish. The lotion can also allow you to wear the less-expensive blends of the precious metal that may otherwise trigger an allergic reaction.

Stop bringing your silver jewelry to the bathroom

Moisture associated with bathing, showering, brushing teeth, or any other washing can be responsible for the tarnish on your silver jewelry. So, to protect your silver necklace or other silver jewelry pieces, leave them in another room when you use the bathroom.

Use a sealant spray

Sealant spray is also very effective in preventing tarnish in jewelry pieces of silver. The coating allows your piece to dry thoroughly and creates a barrier between oxygen, water, and your jewelry.

Mind your storage area

Silver jewelry should be appropriately stored in anti-tarnish bags to avoid rust and black tarnish. For instance, this silver storage bag is perfect for silver pieces.

A jewelry box lined with velvet can also avoid tarnish. A velvet pouch can also do the job by absorbing moisture in the air.

The bottom line

Unlike most precious metals, you’ll need to clean silver jewelry once now and then to ensure it’s looking bright and ready for wearing. The good news is that the silver pieces can always be cleaned using the simple methods discussed in this post.

Filed Under: DIY, Fashion

How To Microwave Ramen

May 31, 2022 Leave a comment

Ramen is one of the most fantastic meals you can ever come across; so yummy yet so cheap. Properly-cooked ramen is sweet and fulfilling, which may explain why it’s one of Kylie Jenner’s favorite dishes.

Sure, there are hundreds of ways to make ramen noodles, but cooking the tasty meal in the microwave is perfect if you’re in a hurry. But how exactly should you make ramen in the oven, and for how long?

This post will take you through everything you need to know about the preparation of ramen in the microwave, including how long it takes, how to do it, and more.

Let’s get started!

How long do you microwave ramen noodles for?

Generally, it would take anywhere between 2-5 minutes to cook instant ramen noodles in the microwave. The cooking time will hugely depend on the type of microwave you use and whether or not you’ve boiled the noodles before.

A powerful microwave will cook your ramen in 2 minutes, while a less powerful microwave takes longer. Likewise, it will take lesser time to cook your ramen noodles if you boil them first.

If you remove the ramen from the microwave and it’s firmer, you may cook it for another minute to make it softer.

What do I need to prepare ramen noodles in the microwave?

In addition to your trusty microwave oven, you need two more main ingredients for microwave ramen, including:

  • Water
  • A package of ramen noodles

You can buy the noodles online or from any grocery store. Most experts recommend that you purchase Top Ramen or Maruchan Ramen noodles, but any instant noodles are okay.

Instead of water, you may use beef broth, chicken broth, or vegetable broth. The broth is perfect for those looking to make ramen stir fry or soup.

Also, you’ll need a microwaveable bowl to cook your ramen. Be sure to get oven mitts, hot mitts, or pot holders to protect your hands when removing the bowl from the microwave.

How do I cook ramen in a microwave?

Fast, sweet, and perfect, microwave ramen noodles should be on every foodie’s to-cook list. There are many methods to cook your noodles, but using a microwave is among the best ways.

Here is how you cook instant ramen noodles in the microwave in a matter of minutes:

Method #1: Prepare water first, then cook ramen noodles

  1. Remove the ramen noodles from their package and place them in a separate container, preferably a microwave-safe bowl.
  2. Add two cups of water to a microwave-safe bowl. Then, place the bowl in the microwave and leave it for about 3 minutes
  3. Using hot mitts, remove the hot bowl carefully and add the noodles. You can break the noodles to help them absorb more moisture faster.
  4. Place the instant noodles in the microwave and let them cook for about 4 to 5 minutes.
  5. Remove the bowl carefully and serve your ramen when it’s hot.

You may add the seasoning packets and mix them with your noodles. Leave the noodles for about a minute to absorb the flavoring.

Method #2: Cooking microwave noodles in a bowl directly

  1. Remove your ramen noodles from the package. Then, break the noodles if you love small pieces
  2. Add the noodles to a microwave-safe bowl. Add about 2 cups of cold water to cover the noodles completely
  3. Place a lid over the bowl to avoid splattering and place the bowl in the microwave. You may use plastic wrap to cover the bowl
  4. Leave your ramen noodles in the microwave for about 3 to 5 minutes. If your microwave is powerful enough, your noodles should be cooked within 3 minutes.

Remove the noodles from the microwave, drain the broth, mix them with your favorite seasoning, and serve them while hot.

Method #3: Cooking microwave ramen in a Styrofoam cup

If your ramen noodles come in a Styrofoam container, you may decide to cook them there. To microwave the noodles;

  1. Break the ramen noodles
  2. Add water to the cup of noodles and microwave it for one minute
  3. Stir the noodles and cook for 30-second intervals until it’s cooked
  4. Serve your meal while it’s hot

Seasoning variations

Yes, the seasoning packet with your package of ramen can suffice, but it wouldn’t do any harm to try more, or would it? In fact, some flavors have proved perfect in making your meal more delicious.

You may add a little bit of butter and olive oil to your noodle to improve their taste. More salt, pepper, garlic powder, chicken bouillon cube, and Italian seasoning will make your meal even more mouth-watering.

If you prefer Asian flavors, add garlic powder, soy sauce, ginger, sesame oil, rice vinegar, and onion powder to your instant noodles. For extra umami flavor, add sesame seeds and chopped green onion.

But you’re free to add whatever you like: hoisin sauce, bean sprout, hot sauce, Spam, Shrimp, Sriracha, tofu, a boiled egg – anything that you love may work just fine. For instance, the famous Kylie Jenner ramen recipe includes adding a raw egg.

The Kylie Jenner ramen recipe may not work well in the microwave because the egg won’t cook properly. Use a small saucepan to try Kylie’s recipe.

You may also cook the egg on the side and add it to your microwave noodles.

How do I cook Kylie Jenner’s ramen recipe?

If you’ve ever tried this Kylie Jenner ramen egg recipe, I’m sure you can agree with me that it’s quick, tasty, and satisfying. And all you need to make it is three simple ingredients and 5 minutes of utmost.

To get started, gather 1 cup of boiling water, one tablespoon of butter, an instant ramen packet, one raw egg, and one teaspoon of garlic powder. Then, proceed to prepare your pack of ramen as follows:

  1. Cook noodles according to the package instruction
  2. Once cooked, place your ramen in a small saucepan and add enough water
  3. Add butter and garlic powder and stir until the butter melts
  4. Add the beaten raw egg to your meal and allow it to cook for one minute
  5. Serve the food hot and enjoy.

Can I cook ramen noodles without a microwave?

Don’t have a microwave to cook your ramen? Don’t worry – you may cook your noodles on a stove.

And this is how you do it:

  1. Add one cup of water to a small saucepan and allow it to boil on a stove
  2. Break your noodles and put them into a medium bowl. Then, pour water over the noodles and cover the bowl – the water must be hot.
  3. Leave it for about 3 minutes. Uncover the saucepan and stir your noodles.
  4. Add your seasoning and flavors and stir.

Please note that your choice of seasoning is not limited to the packaging flavor packet. You may add any flavors that you like.

Recipe tips for the best instant noodles

Whether you’re cooking ramen noodles for the first time or have been cooking them for some time now, I’m sure you’d benefit from a few tips to make your microwave ramen more flavorful.

Here are six useful tips for every ramen lover:

  1. Break your instant ramen noodles before cooking. Broken noodles are easier to cook and eat.
  2. Add more water to your noodles if you’d like more broth. Too much water will spoil your broth, however.
  3. Your noodles should be soft and wavy. Keep cooking them in 30-second intervals if they’re still crunchy.
  4. The total cooking time for your noodles should be about 3 minutes.
  5. Try to elevate your recipe through different additives like protein, vegetables, sauces, or broth

How do I store microwave ramen?

Instant ramen noodles taste the best right after it’s cooked, but that doesn’t mean you can’t save them for another day. If you want to store your leftover microwave cup noodles, allow them to cool and store them in the refrigerator in an airtight container.

You may leave the noodles in the refrigerator for 3 to 4 days. The ramen begins to break down, and its texture becomes different if you leave it there for too long.

You may reheat your ramen in the microwave. Use a microwave-safe container to reheat your meal. You may also enjoy it cold!

Are ramen noodles healthy?

Although instant ramen noodles provide you with B vitamins, manganese, and iron, they lack protein, fiber, crucial vitamins, and other macronutrients. Their TBHQ, MSG, and high sodium contents may also increase your risk of heart diseases, stomach cancer, and metabolic syndrome.

So, be mindful of the number of ramen noodles you take. Tiny amounts of noodles won’t hurt, but too much can affect your health negatively.

Note: To ensure you consume healthy ramen, check the label that comes with your favorite brand.

The bottom line

Together with microwave burritos and frozen pizza, instant ramen is among the fast and easy foods that do the trick when running short of time and money. They’re easy to prepare in the microwave, with the cooking process taking only 3 to 5 minutes to cook.

This post provides you with a simple way to cook microwave ramen noodles. Good luck as you purpose to use it to make the perfect meal.

Filed Under: DIY, Food

How To Remove Dog Tear Stains Naturally

May 1, 2022 Leave a comment

Your Shih Tzu, Poodle, or Maltese is undoubtedly stinkin’ cute. But there is one more way to make it even prettier – dealing with those tear stains under their eyes.

Dog tear stains are common in many dog breeds, and it’s not a major cause for alarm. However, the unwanted color pigmentation may appear unsightly and indicate several underlying medical conditions for your lovely pup.

Luckily there are several natural ways to remove the tear stains, ranging from using apple cider vinegar, dealing with the root cause, trimming the hair, etc.

This post will detail what causes tear stains, how to get rid of them, and how to prevent them from occurring in the first place.

Feel free to jump ahead!

What are tear stains?

Also known as ‘eye stains’ or ‘tear marks,’ dog tear stains are the discoloration and residue left by your pup’s naturally occurring eye discharge. You’ll often notice these stains on white breeds of dogs, including Maltese, Bichon Frise, and Shih Tzus.

You may also notice the problem with dog breeds prone to weepy eyes (epiphora), such as Bulldogs, Pugs, and Boston Terriers. Epiphora isn’t a disease but rather a symptom stemming from several causes.

The stains appear as dark black, rusty-red, or brown discoloration under one or both eyes. The color pigmentation is often accompanied by eye discharge, but not always.

Dog stains can be a cosmetic problem or an indication of more severe conditions, like a corneal ulcer, glaucoma, or yeast infection. Whatever the cause, however, the problem can be dealt with naturally.

What causes dog tear stains?

Tear stains occur when your dog’s tear duct system doesn’t drain properly. Instead of draining tears from the eye’s surface to the nose, the tears flow over the eyelid margin to the dog’s face.

The stains that cause the discoloration of the fur underneath your pup’s eyes are due to porphyrins – a molecule secreted in tears.

Here are some factors that cause tear stains on dogs:

Dog breed and color:

Although you’ll often notice tear stains on light-colored or white dogs, the problem can occur in any dog, regardless of its color or breed. However, the problem is more common in some dog breeds, including Shih Tzus and Maltese.

Dust or smoke:

A smoky or dusty environment may also contribute to the tears in your dog’s eyes. This will lead to stains if the environment remains unchanged for a long time.

Eye infection:

Eye infections may lead to excessive tear production and weeping of the pup’s eyes. Increased moisture may, in turn, cause tear stains and yeast or bacterial infections.

See a veterinary ophthalmologist if you notice a discoloration in the tear stains or other symptoms of eye infection, like itching and redness. It could indicate major health problems.

Glaucoma:

Glaucoma is a condition caused by increased intraocular pressure, which may lead to increased tear production in puppies. The tears may lead to discoloration and tear stains in the affected dogs.

Abrasion to the eye:

Corneal ulcer – a condition where the eye’s protective outer layer is traumatized – contributes to dog’s tear stains. They’re often caused by injuries resulting from the introduction of a foreign object to a pet’s eye.

Brachycephalic breeds are more prone to these injuries as their eye tend to bulge. If your dog has a corneal injury, you’ll notice an active discharge from the eyes and small amounts of tear stains.

Anatomical Abnormalities

Abnormal or ingrown eyelashes can rub the eye’s surface, leading to excessive tears and irritation. Entropion – a medical term for a condition where your pup’s eyelids fold inwards – may also cause irritation and tearing.

Also, dog breeds with shallow eye sockets are more likely to shed tears often than others. This means that they’ll likely have tear stains more than other dogs.

How do I remove dog tear stains naturally?

After knowing what causes the tear stains on your pup, cleaning them will become easier. Here are several natural solutions to help you get rid of the tear stains:

Method #1: Deep cleanse

The first and the best way to remove the tear stains from your dog’s eyes is to clean them well. Use clean water to rub the eye stains.

If the tap water doesn’t help, your dog can benefit from a doggie bathing station or spa for a professional deep cleaning. It will help remove the stubborn spots and stains.

Note: Use warm water to make the bath friendly for your pup.

Method #2: Apple Cider Vinegar/White Vinegar

Some experts recommend altering the dog’s pH, arguing that it controls the production of tears and, thus, the eye stains. Add one teaspoon of distilled white vinegar or apple cider vinegar to about 1 gallon of your dog’s drinking water to use this method.

This will increase the alkalinity of your dog’s body, preventing tear stains. It will also help prevent bacteria or yeast infections from reoccurring.

Other food additives that may also be used in the place of apple cider vinegar or white vinegar are buttermilk powder, coconut oil, or I-Stain (a probiotic enzyme.)

Method #3: Hydrogen peroxide

Hydrogen peroxide is very effective in removing dog stains. To remove the tear stains;

  • Mix one part of hydrogen peroxide with ten parts of water
  • Soak a cotton ball or pad in water-diluted hydrogen peroxide
  • Then, use it to clean the tear-stained area
  • Use warm water to wipe out the peroxide solution

Warning: Hydrogen peroxide is dangerous and shouldn’t get into your dog’s eyes or mouth – it can lead to blindness. Also, too much peroxide may bleach your dog’s fur, which is noticeable for dark brown or black dogs.

Method #4: Milk of Magnesia

You can use milk of Magnesia to remove dog tears and stains from your pup effectively. Add equal amounts of hydrogen peroxide and Magnesia, and then add cornstarch to form a paste.

Then rub the paste into the stained area and leave it for about four hours before thoroughly washing it out. You may use a ‘cone of shame’ to prevent your dog from rubbing it off with its paws.

Method #5: Trim Facial Hair

Certain breeds of dogs, like toy dogs and other small breeds, are prone to tear staining because of how they’re built. For instance, Terriers have long hair around their eyes and mouths, which can irritate their eyes and create excessive tearing if not properly groomed.

To control the tear stains, you should trim the facial hair using a guard clipper. You may also take your pup to a professional groomer (recommended).

Note: Do not use scissors as that can lead to too many accidents.

Method #6: Develop a daily care routine

If you observe a daily care routine by wiping the debris and gunk from your dog’s eyes, you can remove the tear stains forever. Below is an ideal regimen for dogs that have a tear stains problem:

  • Flush eyes using an appropriate canine eye-wash, such as a saline solution, on a daily basis.
  • Use a pet-safe wipe and a clean cloth to clean the gunk from the corners of your dog’s eyes, wiping the fur surrounding the eyes, nose, and mouth.
  • Use the peroxide solution to clean the stains
  • Use an eyewash wipe to rub around and underneath the eye area. Mix one tablespoon of boric acid boiled in one cup of distilled water
  • Develop a regular grooming routine

Method #7: Examine the quality of your food

I know it has been considered a common misconception, but a poor diet can actually be why your dog has brown stains around its eyes. The dog’s food used as fillers in inferior-quality foods can cause allergic reactions, resulting in excess tears and other health issues.

Important: Check with your pet supply store for herbal and all-natural best dog tear stain removers. Be careful when washing your dog with these natural tear stain removers, as they may be harmful to the eyes and mouth.

How do I prevent dog tear stains?

If you’ve tried to remove the tear stains on light-colored dogs, you can agree that the stains are seriously stubborn. Cleaning the stained area and wiping the excessive amounts of the tear will be futile if you’re not addressing the root cause.

So, focus on the following prevention measures:

  • Normalize regular grooming
  • Normalize regular cleaning
  • Protect your dog against debris and allergies
  • Consider your dog’s diet

These measures will improve your dog’s health and prevent tear stains.

The bottom line

Dog tear stains are not life-threatening, but they are among the biggest pet peeves for the dog owners that have to deal with them. Luckily, the brown stains and dark marks around your dog’s eyes can be removed using natural products.

This post provides you with a detailed description of the dog tear stains, including what they are, what causes them, how to remove them, and how to prevent them. Good luck as you purpose to use it to keep your dog cute.

Filed Under: Pets

How to Deal with A UTI at Night

April 22, 2022 Leave a comment

You might have experienced it, too: a burning sensation accompanied by pelvic pain and bloody urination. If that’s how you feel, you may have a urinary tract infection (UTI) and need treatment.

UTIs can start anywhere in the urinary tract, including the bladder, urethra, and kidney, but the result is the same – pain!

woman with painful UTI

According to the National Kidney Foundation, 1 in 5 females will experience a UTI at some point in their lifetime, and although less common, men can get it too. Other recent studies indicate that more than half of all women will experience UTI at some part of their lives.

The symptoms of the infection are unbearable, so you’re likely wondering how to relieve UTI pain and other symptoms at night. If that’s you, you just landed a jackpot in this article.

This post will provide you with everything you need to know about a UTI, including what it is, how you can deal with it at night, and how to prevent it in the first place.

Let’s get started!

What is UTI?

UTI is an infection in any part of your urinary tract system – your urethra, bladder, kidneys, and ureters. Most infections involve the lower urinary tract, including the urethra and bladder.

UTIs are more common among women and older adults and least common in young children under five years. Girls are more prone to a UTI infection because they have a shorter urethra than boys.

Most UTIs happen when bacteria enter the urinary tract through the urethra and start to multiply in the bladder. 75% to 95% of UTIs are caused by Escherichia coli, a bacteria that resides in your intestines.

Getting a UTI is pretty easy. Bacteria in the vaginal, anal, and genital areas may enter your urinary tract through the urethra, travel to the bladder, and cause an infection.

In most cases, this happens during sexual intercourse when bacteria from your partner’s genitals, fingers, anus, or sex toys get pushed into your urinary tract through the urethra.

What are the symptoms of UTIs?

UTI symptoms may vary based on your sex and age, the severity of the infection, and the type of infection you have.

Generally, you’re likely to experience the following symptoms:

  • Cloudy urine
  • Frequent urination
  • A burning sensation during and after urinating
  • Blood in the urine
  • Passing frequent, small amounts of urine
  • Pungent-smelling urine
  • Pelvic pain in females
  • The constant need to urinate
  • Vomiting/nausea
  • Fever
  • Abdominal pain

Depending on the type of UTI, you may experience more specific symptoms. Kidney infections, bladder infections, and vaginal infections, at times, all have similar symptoms.

For the best diagnosis and treatment, it’s always advisable to visit healthcare professionals. The physician will take your urine sample, do a urine test and administer the best UTI medications or recommend the best home remedies.

How can I deal with UTIs at night?

If you’ve ever contracted UTI, we can agree on the same thing: the night is their worst time of the day. Less frequent urination at night allows the urine to increase discomfort and pain in the bladder.

The good news is that there are several ways to deal with UTIs at night and reduce their symptoms. Here are the ten best ways to deal with painful symptoms of UTI at night:

Drink plenty of water

The burning sensation and other types of pain while urinating may tempt you to reduce your daily water intake. After all, avoiding the restroom will help prevent the pain, right?

You’re wrong!

Failing to drink enough water causes the bladder to be more sensitive, and the urine becomes more concentrated, aggravating the symptoms. On the other hand, drinking lots of water helps flush bacteria out of your bladder, reducing pain and other symptoms.

In fact, research shows that the intake of plenty of fluids, including water, reduces UTIs requiring antibiotics by 58%.

However, it’s important to note that this advice mainly applies during the day. Limit your water intake at night to prevent the frequent urge to urinate from disrupting your sleep.

Empty bladder fully

Resident bacteria are likely to grow and multiply in your bladder when urine stays there too long. As such, it’s always recommended that you empty the bladder fully (both daytime and nighttime) when you urinate.

Avoid beverages and foods that will irritate your bladder

Drinking alcohol and coffee and eating spicy foods will likely irritate your urinary tract. They can reduce the blood flow to your bladder, making it hard for your immune system to fight the infections.

Some soft drinks will also irritate your bladder, making the situation worse.

So if you can, avoid spicy foods, reduce or cut alcohol consumption, and avoid caffeine and other soft drinks when you have a UTI or are at risk of contracting one.

Medical treatment for nighttime UTI symptoms

Perhaps the best and most authentic way to relieve UTI discomfort at night is by visiting your physician to treat the infection. They’ll give medications to stop the infection and relieve pain, as discussed below:

Stopping the infection:

Depending on the type of bacteria in your urine and your current medical conditions, your healthcare practitioner may recommend antibiotic medication for UTIs, including:

  • Cephalexin
  • Ceftriaxone
  • Trimethoprim
  • Nitrofurantoin
  • Fosfomycin, etc.

If you have a kidney infection or complicated UTI, your doctor may prescribe fluoroquinolones antibiotics, like ciprofloxacin or levofloxacin. Your physician may also use other treatment methods other than antibiotic-based treatments.

Relieving pain:

Your doctor may administer oral antibiotics to ease discomfort caused by UTIs. Alternatively, the physician can offer prescription medications to relieve pain.

For instance, you may be given UTI analgesics, including phenazopyridine, to relieve pain, burning, itching, and urinary urgency. This medication is available in both over-the-counter and prescription forms.

I’ve found that AZO Maximum Strength works great for getting rid of the pain in the middle the night.

Use a heating pad

UTIs will likely lead to lower abdomen and back pain. You may use a hot water bottle or a heating pad to reduce the pain and cramping in your lower abdomen.

Alternatively, you may take a warm shower. Adjust the water to comfortably warm and take a shower.

The warm water will soothe the cramping or burning sensation you may be experiencing.

Warning:

  • DO NOT take bubble baths, as that will make the condition worse
  • If you’re using the electric heating pad, ensure you do not sleep while it’s on

Take Sodium Bicarbonate

Consuming Sodium Bicarbonate will help minimize the acidity levels in urine, easing the symptoms of a UTI. However, high doses may pose health risks to most people.

How do I prevent UTIs?

Tired of having to deal with UTIs? The best remedy is simple: prevent one from ever striking you in the first place.

Here are 7 tips to avoid future infections:

Make cranberry juice your friend

Yes, cranberry juice has often been classified as a UTI treatment option, but it can only be used as a preventative measure. The juice makes urine more acidic and prevents bacteria from attaching to the bladder’s walls.

Here is how the juice works:

  • UTIs occur when the E. Coli bacteria attached to your bladder
  • Cranberry products have A-type proanthocyanidins (PACs)
  • PACs prevent the bacteria from attaching to your bladder

Remember: Cranberry products won’t cure the UTI infection but will flush the bacteria out. Take enough amounts of the juice to prevent the infection.

Observe good hygiene after sex

Sexual activity is the main culprit for UTI infections. To stay safe, observe good hygiene and clean your genital areas after sex – and ask your partner to do so, too.

Limit antibiotic consumption

Frequent antibiotic use can lead to UTIs. These drugs can cause diarrhea, allowing unwanted bacteria to get into your urethra.

So, antibiotics can heal you when fighting one illness but lead to another problem. So if you can, reduce your antibiotic consumption.

Use probiotics

Probiotics are beneficial bacteria that can help keep your urinary system healthy and free from harmful bacteria. These bacteria can prevent and treat UTIs by:

  • Preventing harmful bacteria from sticking to your bladder
  • Producing hydrogen peroxide in urine – has antibacterial properties
  • Reducing urine’s pH, making the conditions unfavorable for bacteria

Probiotics exist in several products, including yogurts, sauerkraut, kefir, and some types of cheese. You may also buy probiotic supplements online or from local stores.

Stay hydrated

Drinking a lot of water will help you flush out unwanted bacteria from your body. And don’t hold the frequent urge to urinate.

Get vitamin C supplements

Vitamin C is an antioxidant that helps boost your immune system. It also reacts with nitrate in your urine to form nitrogen oxides that kill bacteria.

Vitamin C also lowers urine pH, making it inhabitable to bacteria, including E. Coli. Taking it along with other supplements may help maximize its benefits.

Wipe front to back

Wipe from the front to the back to avoid unwanted bacteria entering the vaginal area. This tip applies mostly to ladies, but it can help men, too.

When to see a healthcare provider?

Yup, conversations about UTIs can be uncomfortable, but it’s best to seek professional medical advice if you’re experiencing symptoms consistent with a UTI. The doctor will likely give you antibiotics and other medications to treat the condition.

Seek further medical attention if:

  • You’re experiencing severe symptoms of UTI like high fever
  • You’re vomiting uncontrollably
  • You have a recurrent UTI.

The sooner you visit a healthcare professional, the sooner you’ll ease the symptoms of a urinary tract infection and get a good night’s sleep.

The bottom line

UTIs are associated with uncomfortable symptoms that can interfere with sleep. This paper provides you with several tips to help you deal with a UTI at night and prevent the infection from striking you in the first place.

Filed Under: Health & Wellness

How to Get Over a Sinus Infection Fast

April 21, 2022 Leave a comment

You have a stuffy nose, a chronic headache, pressure is building in your forehead, and you don’t feel good? You may be having an acute sinus infection, and you’ll need to deal with it.

Sinus infection, referred to by the medical term acute sinusitis, affects millions of Americans each year, costing them over $1 billion. There are several best ways to treat the debilitating infection, though, whether you prefer home remedies or over-the-counter drugs.

If you’re looking to understand how to get over a sinus infection, keep reading. This post will detail everything about sinus infections, including what they are, how to treat them, and how to prevent them in the first place.

What is a sinus infection?

A sinus is an air-filled nasal cavity present in the facial bones and drains into the nose. They’re present on the cheeks, forehead, and near the eyes.

Sinus infection happens when the sinus gets blocked, and much mucus gets trapped in it. With the nasal discharge trapped in the sinus, bacteria, viruses, or fungi (rarely) grow easily due to the stagnant and moist environment.

Some of the symptoms of sinusitis include:

  • Postnasal drip
  • Facial pain
  • Headache
  • Cough or sore throat
  • Fever
  • Fatigue
  • Nasal congestion and obstruction
  • Halitosis (bad breath)

A sinus infection may be confused with a common cold based on its symptoms. However, the two infections are different, with the main difference being how long their symptoms linger.

The symptoms of a common cold last no longer than ten days, while chronic sinusitis, a more chronic infection, can stay for about 12 weeks or longer. Also, the common cold produces clear mucus, while sinus infection yields yellow or green mucus.

Types of sinusitis

There are three common types of sinusitis, depending on how long the symptoms last. They are;

  • Acute sinusitis; symptoms last for 4 weeks or less
  • Subacute sinusitis; sinuses swelling is present for about 1 to 3 months
  • Chronic sinusitis; severe cases where sinuses swell for over 3 months

Let’s see how you can get over a sinus infection below:

How can I get rid of the sinus infection fast?

You have to go through your days in pain and fog when you have acute sinusitis. But you shouldn’t have to endure the pain for long, as there are easy ways to get rid of the infection.

Here are ten methods to help ease your sinus pain and inflammation and enable you to get over the acute infections:

Nasal spray

If you have a sinus infection disturbing your peace, over-the-counter nasal sprays may be your answer. If well used, most nasal sprays will minimize swelling in the nasal passages and allow mucus to drain from the sinuses.

However, do not misuse the nasal spray as overuse can result in a rebound phenomenon that makes nasal passages swell and close up. Most nasal decongestant sprays should be used no longer than 3-4 days, but steroid and saline nasal sprays can be used longer.

Also, make sure to read and follow the instructions that come with the spray. If you have underlying medical conditions or are pregnant, you should first consult your physician before using nasal sprays.

Nasal irrigation

Nasal irrigation may also be used to relieve sinus symptoms. A recent study shows that people that use nasal irrigation experience fewer symptoms, fewer sinus headaches, and are less likely to need OTC drugs.

You may use a neti pot, a syringe, or a rinse bottle for nasal irrigation. A neti pot is a small container created to rinse mucus or debris from your nasal cavities.

Neti pot is mainly used to treat nasal allergies symptoms, colds, or sinus problems. However, be careful when using the container, as using it with the wrong type of water can be dangerous.

Avoid using water straight from the tap for nasal irrigation. Unlike the stomach, whose acids kill bacteria and parasites, using tap water in the nasal environment won’t kill these germs and may lead to severe infections.

For safety purposes, the Food and Drug Administration (FDA) advises you to take the following precautions:

  • Boil tap water for about 3-5 minutes and leave it to cool before using it
  • Store the previously boiled water in a clean container and use it within 24 hours.
  • Buy sterile or distilled water to use
  • Use a specialized filter to remove water-loving germs

You can also buy nasal irrigation solutions online or from a pharmacy or make one yourself. To make a saline solution for use:

  • Put about three tablespoons of iodide-free salt into a clear airtight container, and then add one tablespoon of baking soda
  • Add 1 cup of sterile water (8 oz) into the container
  • If the resulting saline solution causes a burning or stinging sensation, reduce the amount of salt and baking soda
  • If the solution is meant for young children, use ½ tablespoon of the dry mixture and mix it with half a cup of sterile or distilled water (4 oz)
  • Use a neti pot or small syringe to apply the solution

Then, to clear your sinuses:

  • Get in the shower or hold your head over the sink
  • Rotate your head to the right and squeeze the saline solution into the left nostril while breathing through the mouth. The solution should come out from your right nostril
  • Turn your head to the left, and repeat the process
  • Clean the neti pot using distilled or sterile water and dry it thoroughly

You should replace your irrigation bottles after a few months to avoid the spread of infection-causing bacteria or germs.

Steam inhalation

Although not well supported by evidence, some trials show that steam inhalation can be used to relieve some sinus infection symptoms. To use this method, lean over a bowl of hot water and place a towel over your head.

Then, breathe deeply through your nose for about 10-15 minutes, and repeat this process about 3-4 times per day. To make the process more effective, you may add 1-2 drops of essential oils – like peppermint oil or eucalyptus oil – to the water.

Specifically, eucalyptus oil has antibacterial and anti-inflammatory properties, making it an effective treatment method for sinus rinses. You can purchase this type of oil online or from health food stores.

Rest

This is one of the best natural remedies for sinus infections. It helps your body recover and gives it the energy to fight against viral, bacterial, or fungal infections.

So, stay at home, have plenty of rest, and eat well to help get over the infection faster. This can also help in reducing the spread of viral sinus infections.

East some spices

The Eustachian tube connects your ears, nose, and throat, meaning that what you eat impacts your nasal passages. Eating spicy foods like horseradish, wasabi, hot sauce, or hot peppers can open your sinuses quickly.

However, this response may not last long, especially if you suffer from a bacterial sinus infection. Spicy foods should be your go-to natural remedies if you want relief for a few hours.

Hydration

Drinking plenty of clear fluids has also proved effective in dealing with acute sinus infections. Among the liquids that can help you get over the infection include:

  • Plain, clean water
  • Hot water with honey, ginger, or lemon
  • Broth
  • Herbal teas

However, stay away from carbonated drinks like soda when you have sinus.

Over-the-counter medications

Depending on what caused the sinus infection, OTC medications like decongestants and antihistamines can provide you with quick relief. For instance, antihistamines will help you have an allergy, while decongestants will be effective in the case of a bacterial infection.

Other prescription medications, like aspirin and ibuprofen, may be used as pain relievers. They’ll help ease symptoms of a sinus infection like fever, headaches, and localized pain.

Warm compress

Applying a warm compress to your face may also relieve sinus pressure and ease facial pain. To get a warm compress, soak a clean towel in hot water, wring it out and place it on the affected area of the face.

How can I prevent sinus infections?

Centers for Disease Control and Prevention (CDC) states that 9/10 of sinus infections in adults are caused by viruses. This means that the infection is highly contagious.

On the positive end, viral infections can be prevented easily. If allergies or a structural problem doesn’t cause your infection, the following measures can help you prevent it:

  • Reduce stress
  • Get a yearly flu vaccination
  • Avoid people with flu or cold
  • Stay hydrated
  • Eat an antioxidant-rich diet

If your sinus infection is caused by allergic reactions or reduced immune system, taking vitamin C can help prevent the infection by boosting your immunity.

When do I seek medical care?

According to CDC, you may need medical treatment if you have:

  • Recurring sinusitis – it may mean that you have a deviated septum
  • Any severe symptoms like facial pain
  • An infection that lasts for more than ten days
  • High fever lasting 3-4 days

Young children (under three months old) may need to see their healthcare provider immediately after the symptoms appear.

Final thoughts

Sinus infections are common, affecting 31 million Americans each year. The good news is that the signs and symptoms of sinusitis can be eased through several home sinus infection treatments, including nasal irrigation, drinking hot liquids, and eating spicy foods.

This article discusses sinus infection, including what it is, how to prevent it, and the different treatment options. I hope you’ve enjoyed it.

Filed Under: Health & Wellness

How To Clean Gasoline Off Clothes

April 19, 2022 Leave a comment

Whether you work on vehicles or are a driver who needs to get some gasoline from the gas station, having gasoline spill on your clothes once in a while is almost inevitable. Sadly, gasoline isn’t only odiferous but can also wreak havoc on your clothes.

If you get gasoline on your clothes, don’t fret. We have all been there, so we’ve gathered some helpful tips for cleaning the gasoline off your clothes and removing its strong smell!

Let’s dive right in!

What is gasoline?

Gasoline is a fuel obtained from crude oil and other petroleum liquids and is mainly used in vehicles. It’s made up of much different carbon- and hydrogen-containing chemical compounds responsible for its foul smell.

Benzene is the compound in gasoline residue responsible for the gasoline’s gassy smell. It’s added to gasoline to increase octane levels, enhancing fuel efficiency and engine performance.

Does gasoline stain clothes?

Gasoline is among the worst stains to rid of from your clothes. It leaves an oily residue and a pungent smell on your clothes, even if washed and dried severally.

However, that doesn’t mean you can’t remove the gasoline stains off your clothes. You can clean the stains by throwing the cloth in the washing machine and using the right products.

How do I clean gasoline off my clothes?

There are several methods you may use clean gasoline off your clothes. Here is a list of the materials and tools you need to get started:

  • Paper towels
  • Stain remover
  • Scrub brush
  • Ammonia
  • Baking soda
  • Enough Vinegar
  • Orange cleaner
  • Hydrogen peroxide
  • Dish soap, and more.

These products are available online or from local hardware stores. Once you acquire them, proceed to remove the gasoline stains in different ways as discussed below:

Method #1: Pre-treating your gasoline-stained clothes

The first thing you ought to do if the stain is still wet is to blot it with paper or old towels. Alternatively, sprinkle baking soda on the stain to remove the excess gasoline.

Then, you can pre-treat the gasoline-stained clothes using a liquid dish detergent or commercial stain remover product, as follows:

  • Apply the dish detergent or stain remover product to the stained area
  • Use a scrub brush to work the detergent or stain remover into the cloth, and leave it for about 15-20 minutes
  • Hand-wash the fabric by soaking it in warm or hot water (depending on the fabric type) for about 30 minutes.
  • Then, rinse your clothes with clean water to remove the gasoline stain and stain remover. If any odor or stain remains (highly probable), proceed to the next method.

Important: Leave the paper or old towels outside for about 24 hours to dry. This reduces the risk of fire.

Method #2: Removing the gasoline stains with baking soda

Baking soda is among the best products for removing gasoline stains from your clothes and shoes. It works perfectly to rid traces of oil products, including gasoline.

Here is a step-by-step guide to using baking soda for this purpose:

  • First, add four tablespoons of baking soda to a bowl with one glass of water. Stir to form a baking soda paste
  • Then, gently apply the baking soda paste to the stained area and leave it for about an hour. Baking soda will neutralize the gasoline stains and the pungent smell from your clothes if you wait long enough
  • Fabric air-dry for several minutes, then brush off the baking soda from your cloth and rinse it in cold water
  • If the gasoline odors and stains are still there, repeat the soda soak process until they’re gone

If the stains remain even after repeating the process, you may need to try other methods.

Method #3: Using white vinegar to clean gasoline off your clothes

The next effective method to remove gasoline from your clothes is using a mixture of equal parts vinegar and water solution. White vinegar has acidic properties, making it a perfect gasoline stain and odor remover.

Use less or more vinegar mixed with hot water, depending on how strong the gasoline stain and odor are.

To remove the gasoline stains from your apparel:

  • Soak it in a basin with one or two cups of white vinegar and hot or cool water solution for about 30 minutes
  • Then, use cold water to remove the remaining stains by hand.
  • Rinse the fibers of your clothing in cold water, and don’t scrub the stains vigorously
  • You may use scented white vinegar or an aromatic scent to the mixture to remove the white vinegar solution smell.

If the stain and odor persists, repeat the vinegar soak or seek the next method.

Method #4: Using dish soap to clean gasoline off clothes

Yup, dish soap can do the magic, too. It’s made up of powerful enzymes that can break down oil and grease stains.

Apply varying amounts of dish soap – depending on the types of stain – to the stained area, and leave it for 15-30 minutes. Then, soak the fabric in hot or warm water (check the tag for fabric type) for about 30 minutes.

Rinse the soap out, and leave it in the open air to dry. If the stains don’t come out, you may repeat the process with more dish soap.

Method#5: Using Ammonia to remove gasoline off clothes

Suppose the diesel smell is heavy, and you can still smell it even after trying the above methods. You’re dealing with stubborn stains that may only be removed by fabric soaking in Ammonia and water solution.

Here is how you go about it:

  • Place your gasoline-stained clothing in the washing machine without detergent. The washing machine is perfect as it has a lid to prevent the Ammonia smell from filling the house.
  • Then, add about ¼ cup of Ammonia, and fill the machine with warm water
  • Clothes soak in the Ammonia solution overnight
  • Drain the washing machine and check whether the stains have disappeared.
  • Wash the cloth in a tub of warm water to remove the ammonia solution

Important: Ammonia is a strong chemical that may bleach or wear out your skin, so wear gloves while handling it. Also, please don’t mix it with other chemicals as that could lead to flammable gas fumes.

Method #6: Remove stains with fast orange detergent

You may also hand-wash your gasoline-stained apparel using Fast Orange Laundry Detergent. It’s specifically formulated to remove odors and stains caused by oil, gasoline, and other mechanical fluids.

Remember: Until the gasoline odor is gone, hand-washing your pieces of clothing is the only 100 percent safe method. Use this regular detergent for hand-washing by adding a little of it to cool water, then stir it up, and let your fabric soak for about half an hour.

The gasoline odor and stain should be gone by now. If not, repeat the process or move on to the next method.

Note: Home-made orange and lemon juice will also make the perfect natural laundry detergent for cleaning gasoline-stained clothes.

Method #7: Using Hydrogen peroxide

Hydrogen peroxide is yet another effective chemical to remove gasoline off your clothes. This oxidizer, antiseptic, and bleaching agent will clean your apparel, remove the gas stains, and make them new again.

Dilute hydrogen peroxide in water to prepare an efficient cleaner against stubborn gasoline stains and odor. This solution has antibacterial and antiviral properties, perfect for cleaning your garments.

Method # 8: Mix coffee grounds

The strong gasoline odor can be toxic to some textile fabrics – they can even destroy your clothes. Using coffee grounds is one of the best ways to get these stains from your clothes.

Coffee grounds have similar effects as baking soda on the affected items. They’ll remove the gasoline odor and stains effectively, like baking soda.

Mix coffee grounds with water and smear the solution to the stained area to get started. Then, let the material soak for about an hour.

Then, brush the coffee grounds off and wash the stains.

Method #9: Use mineral oils to remove stains

Mineral oil can also work perfectly to remove gasoline stains and odors from affected items. And it’s simple – pour the natural oil on the stained area and rub it gently.

Mineral oil is clear and odorless and is a common ingredient in personal care products, like baby oil. The oils come in different forms, including liquids, gels, and oils, and can also be found in stainless steel cleaners, wood treatment products, furniture polish, etc.

Method 10: Try a professional dry cleaner

If all the methods fail to remove the gasoline stains and odor from your clothes, it may be time to try professional dry cleaners. Most have the right products, machinery, and experience to remove such stains.

How do I remove the smell of gasoline?

Removing the gasoline’s pungent smell is why pre-treatment is vital. Even if you hand-wash clothes and the stains come out, the chances are that the smell will remain if you fail to pre-treat the stain.

Small amounts of baking soda or a cup of vinegar can help you pre-treat the stains to help remove their odor. You may also use a clean rag or damp old towels to blot the stain.

You may also try commercial or natural deodorizers to remove the remaining gas smell. For instance, you may use the ZORBX Unscented Odor Remover Spray – it works perfectly to remove the gasoline odor.

Use a spray bottle to spray the deodorizer to the affected area.

Final thoughts

Gasoline stains and odor can be hard to remove, but pre-treating the affected item with baking soda or white vinegar and cleaning it with the right products can save the day. This post provides you with ten simple ways to pre-treat and clean your gasoline-stained cloth.

Good luck as you purpose to use it to clean your gas-stained work shirts or other affected items!

Filed Under: DIY

How to Make The Color Black

April 15, 2022 Leave a comment

Black is perhaps one of the most underrated colors in the world. Its appearance in paintings signifies dignity, mystery, and elegance – and some of the greatest painters throughout history swear by it.

Scientifically, black is not considered a color but rather the absence of light. However, you may use scientifically visible colors, like yellow, red, and blue, to make your own shades of black.

white cement wall with giant black heart painted on it

Yes, you can buy a tube of black paint from the store, but that’s not as fulfilling as mixing your black paint colors. Making the black color yourself allows you to achieve the different black paint hues and shades for different painting purposes.

This post will show you how to make black color in several easy steps. It’ll save you money and help you make much more vibrant and dynamic black than what you can get from a tube.

Why should I make my black color?

Although most shades of black will tend to look the same – just like with other colors – you can create several tones and shades of black. Because of this potential for variation, you should know how to mix your own black – it will allow you to make unique creatives.

Yes, mixing pure black by hand may be tricky, but you have the chance to create a more dynamic and vibrant color. You can make different shades of black, ranging from very light to darkest blacks.

woman's hand mixing black color

How do I make the color black?

Whether you’re a professional painter or just painting for fun, several shades of black will allow you to put the vision in your mind’s eye onto the painting. You can make the color black in three different ways: combining the primary colors or using complementary colors such as blue and green as the base colors.

Within each method, other tricks exist to help you create different shades of black. Here is how these methods work:

Method #1: Making the color black with primary colors

This is perhaps the easiest and best way to make the color black. You need equal amounts of the three primary hues – blue, red, and yellow – and mix them on a color palette.

Here is a step-by-step guide to making the color black using this method:

  • Put equal amounts of the primary colors on a palette. If you use a paintbrush to add paint onto the palette, use different brushes for each color.
  • Using a paintbrush, a palette, knife or any metal scraping tool, mix the colors and stir for about 15 minutes
  • Adjust the hue of the black using different shades or ratios of the primary colors.

For this method, you may use any paint medium, including acrylic paint, watercolor, and oil painting mediums. And regardless of the medium you use, you can create different hues by using different shades of your primary colors.

For instance, using lighter hues of the primary colors will give rise to an almost-brown, lighter shade of black. Mixing the three primary colors in unequal ratios will also produce different shades of black.

Here are a few other tricks to make the black color using the primary colors:

Making the color black with printing primaries:

You may also combine printing primary colors – Hansa Yellow, Phthalo Blue color, and Quinacridone Magenta to make the color black.

Hansa yellow is a bright and pretty shade of yellow, Phthalo blue is a bright shade of blue, and Quinacridone magenta is an almost-maroon shade of red. To make the black color using these colors:

  • Start by adding the magenta color into a palette with the blue paint. This will give rise to a warm and vibrant shade of purple.
  • Then, add the yellow shade. It will cancel out the purple shade, leaving a lovely dark shade of black.

The shade of black obtained here is one of the closest shades of pure black you can make.

Making the color black with other primary shades:

You may also use other shades of the primary colors to achieve the tone of black you want. For instance, mixing Yellow Ochre, Alizarin Crimson, and Ultramarine Blue will create a more brown shade of black.

On the other hand, using Rose Madder Genuine, Cobalt Blue, and Aureolin will give you a soft black.

To make the brown shade of black using Yellow Ochre, Alizarin Crimson, and Ultramarine Blue:

  • Start by mixing the Ultramarine blue and Alizarin Crimson shades to create a dark shade of purple
  • Then add the yellow ochre and swirl to cancel the purple hue. And there you have it – a brown shade of black

This dark hue has hints of brown, making it ideal for adding dimension and shadows to objects in your painting.

Note: You can make the color black in more ways than just using the primary colors. In the consecutive methods, we’ll look at making the black color using green and blue as the base colors.

woman's hand painting with black paint

Method #2: Making the color black with a Blue base

Although you can rely on the primary colors to make the perfect shades of black, knowing how to use other varieties couldn’t hurt. Here, we’ll go through two methods of making the color black using blue as the base color.

Make the color black with Phthalo Blue and Cadmium Orange

This is your go-to method if you want to achieve an almost-dark-grey shade of black without relying on the color white.

This color combination complements each other perfectly to create a lighter black. Each of the shades is vibrant and bright, neutralizing each other very well.

The final black hue is ideal for painters who want to add shadow to their objects or those who want a lighter black shade.

Make the color black with Ultramarine Blue and Burnt Umber

If you want to achieve a much cooler and darker shade of black, then the color combinations of Ultramarine Blue and Burnt Umber will work perfectly for you. Equal portions of the two paint shades will give you a rich black shade.

However, you can alter the ratio of the colors to create different shades of black as you wish. For instance, adding more shades of blue will make your black color cooler, while more shades of Umber will create a lighter shade of black.

Alternatively, you can mix Ultramarine Blue with Burnt Sienna instead of Burnt Umber. This will create a warmer shade of black because Burnt Sienna is lighter and warmer than Burnt Umber.

Note: The exact black shades will depend on the shades of blue you use and the colors you choose to add. However, you can keep experimenting to see the number of unique black shades you can make.

You may use shades of black to outline the night sky or the ocean’s depths.

black paint drops into white paint

Method #3: Making the color black with a Green base

You may also use a green base to make the color black. In fact, most commercial black paints are based on green pigments.

Here, we’ll look at three different ways to combine Phthalo green with other paint colors to make the black color. We recommend Phthalo green because it’s a rich and very dark shade of green.

Making black with Phthalo green and Alizarin Crimson

Like in the primary color method, you can also use Alizarin crimson to make the color black. The process is similar, only that you’ll condense the blue and yellow colors into a single color.

You may combine the two shades on paper until you achieve the color shade you want. Mark the proportions needed and use them to create more shades of black.

Making black with Phthalo green and Quinacridone red colors

Using Quinacridone red is also similar to the primary color method. Combining the two colors gives rise to what’s known as transparent black – transparent because the component colors are transparent.

 Although the process may take time, the final color is a transparent shade of black with a cool tone that closely resembles what you can buy in a tube.

Making black color with Phthalo green and Dioxazine purple

Phthalo green and Dioxazine purple combine to give rise to a beautiful, velvety shade of black. The two colors’ shades complement each other because they’re both dark.

To get your shade of black:

  • Mix equal parts of each of these colors in a palette. Then, test the appearance of the color on a piece of paper to help you get the best results
  • The green shade may overpower the purple, in which case, you should add a little more purple.

The final color is beautiful, rich, and velvety dark, which may be used for so many purposes in painting.

Remember: the three methods highlighted here can be used to make any shade of black you want. All you need to do is balance the hex code according to your desired shade of black.

The final thoughts

The color black is vital in paintings – it’s used to reduce the value and saturation of color and create shadows. And while you can buy a tube of black paint color, making it yourself is more fun and fulfilling.

This post provides you with three different methods of creating cool and warm blacks. Please note that you’re not limited to the colors mentioned here; you’re welcome to try with different colors.

Filed Under: DIY

  • « Previous Page
  • 1
  • 2
  • 3
  • 4
  • 5
  • …
  • 7
  • Next Page »

Popular How To’s

How to Contact TikTok About a Banned Account

How To Cook Frozen King Crab Legs

How to Pick a Mini Watermelon

How To Care For Air Plants

Categories

Food

Travel

DIY

Finance

Parenting

Technology


Copyright ©2026, How to Knowledge. All Rights Reserved. Custom design by Pixel Me Designs